3D CAD and printing
Trying a lot of new stuff in a familiar field!
Used tools, methods and technologies:
- SLA printer - Original Prusa SL1S SPEED
- SLA print postprocesing: washing and curring
- Parametric designingin Fusion 360 and .webp gif creation
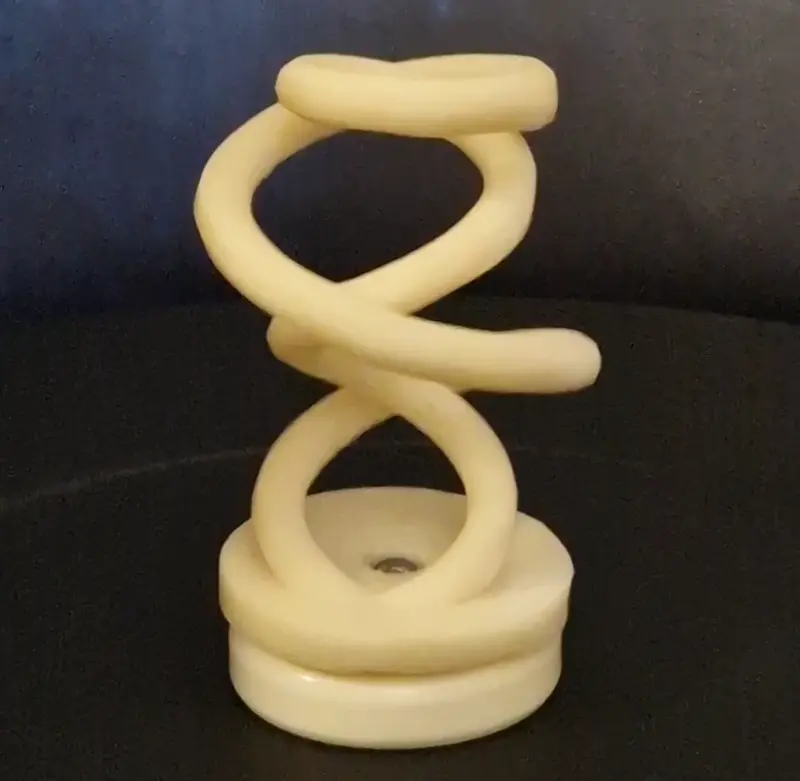
This week, from 2D to 3D! I wanted to try something really new. I am into 3D printing for more than 2 years now but I never used a resin printer and a programming based modeling software, like OpenSCAD. And I had a object in mind for a while that required these two methods to be producable. Its hard to precisely describe the shape, but basically its a dual spiral sculpture that, when rotating, creates a contradictory stroboscopic effect. Its better to see the gif here:
CAD
As said before, I used OpenSCAD. I learned it from online guide and was able to get the basic shape pretty fast, like 2 hours, because I had the math in mind beforehand. However, the top transition between outer and inner spiral was sharp, not smooth. I took me the few more hours of trying alone and with chatbot´s help before I found out: I was putting a sine function into a wrong variable! Then, it looked great and was ready to by sliced. For reference, I tried to make this exact shape about a year ago in Fusion 360 and failed even after hours of trying. The power of code CAD.
Printing and display
The print was done using a Original Prusa SL1S SPEED printer and took 2h 15min to print, 4min to clean in IPA bath and 8mins to dry and cure, all in Prusa machines. I used a BioBased60 Ivory White resin from Prusa. Support removal and postprocesing was around 15min. The finished product was great looking but it turned out that probably because of the position of printing, the dimensions of the inner hole were slightly smaller and it didn´t quite fit. If you want to print it yourself, here is printables link, with better version coming soon.
Rotation is needed to see the effect and so I made a small platform with a hole in the middle, so that my sculpture fits on a gramophone (turntable). This was my original idea a year ago to use gramophone as a display space for it since I collect LP´s and have a gramophone at home. Then I realized: How am I going to show the rotation on my website? Video would need to be long == large file for the illusion to be visible and clear.
Solution? A GIF! Actually, this one is a .webp format ruster picture, which offers better color quality and smoothness than a .gif format. I shot a short video on my phone and used a simple web-based tool ezgif.com to convert it to a .webp format. The moving picture you see is just one rotation in a loop. I was able to calculate duration of one rotation from the spining speed of LP disks, precisely 33 1/3 rpm. That means 0.556 rotation per second and 1.7895 seconds per rotation. Then just cutted 1.7895 seconds long sequence of the video and it went smooth like butter.

Print is done upside down from a pool of resin. For manipulation with the print and resin, use gloves!

It took just few clicks to prepare the object in Prusaslicer, since automatic supports are very good here, unlike FDM ones.
Parametric CAD

For parametric CAD project I have a small story to it. In fact, I was on a family vacation in a country with very poor internet connection this week. However, that didn´t stop me from designing. While being 11 km above ground in an airplane, I stumbled upon a plastic container made from ABS used for serving food on the plane.
The challenge I set to my self was to model it parametrically in Fusion 360 on board of the plane. That gave me around 4 hours, but actually more limiting was my PC battery life, around 3 hours while running offline Fusion. And no modeling from a photo. Picture taken on board of the plane. And yes, I did return the box back, didn´t steal it.
I succeeded in the challenge, almost. The box is both 1:1 copy and fully parametric, that´s a success. But the side pattern was to complicated to do parametrically in that time. It actually proved so complicated that I gave up doing it even afterwards.
Parameters of the container are its length, width and height. Original values are 250x83,3x50 mm respectively. By the way if you wonder, how the heck on a plane did I managed to measure that, yes, I had a basic ruler in my backpack. And another obstacle was the absence of a mouse so the whole design is plotted using touchpad.

Original dimensions

Smaller sqare version, parameters 100x100x20

Parameters 400x83,3x70
Summary
It was a joyfull weekly froject, especially getting to know a new printing technology. As always, you can find my models on my printables profile and feel free to let me know and feedback or improvements.